Category Archives: Dinner

Stuffed Peppers with Italian Sausage

stuffed peppers, italian sausageWhat’s stuffed to the brim and loaded up with veggies?

If you said a vegetarian at Thanksgiving, you’d be right.

You’d also be right if you said these stuffed peppers with Italian sausage.

They are veggie-centric so if you’re trying to increase the amount of veggies you eat, these are for you.

And even if you’re not, these stuffed peppers make a really easy and tasty dinner.

stuffed peppers, italian sausageThe filling is a combo of Italian sausage (← hello flavor), onions, zucchini, and mushrooms all covered in marinara sauce.

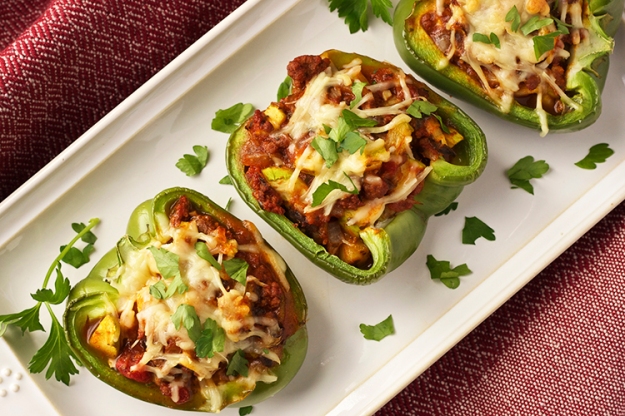
Bright green bell peppers get stuffed to the brim with this yummy mixture, topped with Parmesan, and baked until the peppers are warmed through and the cheese is melted.

I originally tried this recipe with whole peppers but thought they were really awkward to eat. Trying to cut into a hot, loaded pepper while keeping it from toppling over and staining me with marinara is not a game I want to play at dinner, especially if I’m hangry.

The solution?

Pepper halves! This version was suggested by my hubby. He’s a genius. They are much easier to eat in my opinion.

Stuffed Peppers with Italian Sausage

  • Servings: 4
  • Print

  • 4-5 green bell peppers with a solid shape (get 5 if they seem a little smaller), cut in half, remove pith and seeds
  • ½ lb. ground Italian sausage
  • ¼ large onion (about 3/4 c.), diced fairly small
  • 2 zucchini, diced fairly small (peeled, optional)
  • 5-6 crimini mushrooms, diced
  • 1 ½ c. marinara sauce
  • pinch of salt and pepper
  • Shredded Parmesan for topping

Preheat oven to 350º. Cook the sausage in a large skillet over medium heat, about 5 minutes, breaking it up as it cooks. When the sausage is no longer pink, add the onions, zucchini, mushrooms, salt, and pepper. Cook for 4-5 minutes until all of the veggies are tender. Pour in the marinara sauce and stir until it’s mixed in. Carefully filled each pepper half and place them on a baking sheet. Top with a pinch of shredded Parmesan then bake for 25-30 minutes.

White Bean Chili

white bean chiliIn the same way a song has the power to transport you back to that awkward middle school dance, this white bean chili has the power to transport me back in time.

Not that far back though. Just to last fall when I moved from Oklahoma to Wisconsin.

I was working from home at the time, which was a harder transition from being in an office than I thought it would be. We were running low on groceries and I also really needed to get out of the house.

I went to Colectivo, a local coffee shop, to get coffee and lunch and work for a while. I spotted White Bean Chili on their menu and immediately knew I wanted to try it.

It was fantastic – hearty, slightly creamy, lots of warm spices, and it was served with some whole-wheat toast. From the first bite, I knew I had to recreate it.

white bean chiliI ordered it a few more times and eventually asked if I could get the recipe. I didn’t get the recipe but they did give me the ingredient list, which was like a golden ticket.

It made the recreation process infinitely easier.

Vegetarian or not, this chili is truly delicious. I did try a version of it with chicken and chicken broth but I thought the original version was better. If you do prefer to add meat, I would recommend sticking with the original recipe and just add in some cooked chicken.

White Bean Chili

  • Servings: 4-6
  • Print

  • 1 small onion, diced
  • 3 stalks celery, diced
  • 2 garlic cloves, minced
  • 1 zucchini, diced
  • 1 red pepper, diced
  • 1 ½ T. ground cumin
  • ¾ t. dried oregano
  • ¾ t. ground coriander
  • pinch of cayenne (omit if you don’t like spice)
  • 3 c. water
  • 1 15 oz. can Northern white beans, drained and rinsed
  • 1 15 oz. can garbanzo beans, drained and rinsed
  • 1 heaping T. flour
  • 2 T. olive oil
  • salt and pepper to taste

In a large pot, heat the olive oil over medium heat. Once the oil is hot, add the onions, celery, garlic, and a pinch of salt and let them cook for 2-3 minutes. Add the zucchini and red pepper and cook for 2-3 minutes. Add the cumin, oregano, coriander, and cayenne, cook for 1 minute until fragrant. Pour in the water, Northern white beans and garbanzo beans. Bring the chili to a boil and reduce to simmer for 30 minutes. After 30 minutes, mix the flour with 1-2 T. water until smooth in a small container; make sure there are no flour lumps. Pour the mixture into the chili and give it a stir. Let it cook for another 10-15 minutes to thicken up.

Inspired by Colectivo’s White Bean Chili.

Pesto Turkey Sandwich with a Crispy Parmesan Crust

pesto, turkey, sandwich

I don’t know how this happened…

This is my first sandwich on the blog. Say whaaaat?!

My husband is not happy about this. His response when I showed him my photos was and I quote — “How come you never make sandwiches?! You need to make more sandwiches because A) I really like sandwiches and B) you take good sandwich photos.” (<– Sincerity or flattery with an ulterior motive to get more sandwiches? Hmm…)

Either way… more sandwiches are in our future.

pesto, turkey, sandwich

And every single one of them is going to have a crispy Parmesan crust. Guar-an-teed.

This sandwich is really simple and really delicious.

It contains layers of melty Swiss, rich pesto, sliced turkey, and Roma tomatoes grilled to perfection. Nobody wants a cold sandwich when there’s a foot of snow outside so if you’re reading this, please send a summer breeze. Thaaanks. :)

Pesto Turkey Sandwich with a Crispy Parmesan Crust

  • Servings: 4
  • Print

  • 8 slices of bread
  • 8-12 slices of deli turkey
  • 4 slices of Swiss (or Mozzarella)
  • 2 Roma tomatoes, sliced
  • about 1/4 c. basil pesto
  • about 1/2 c. Shredded Parmesan
  • Butter

Heat a nonstick skillet over medium heat. For each sandwich, spread butter on one side of two pieces of bread. On the non-butter side of one slice of bread, spread about 1 T. pesto, top with 2-3 slices of turkey and several Roma tomato slices. On the non-butter side of the other slice of bread, place 1 slice of Swiss. To toast the sandwich, put a big pinch of Parmesan (about 1 T.) in the skillet and immediately put one side of the sandwich butter side down on top of the Parmesan. Repeat for the other half of the sandwich. To help melt the Swiss, put a lid on the pan. Let the sandwich toast for a few minutes, then flip the Swiss half of the sandwich on top of the turkey half of the sandwich. Repeat the process for the other 3 sandwiches.

Tip: Heat the turkey slices in the skillet before assembling the sandwiches to ensure the middle of the sandwich gets heated as well. Wipe out the skillet then toast the sandwiches.

Author: Recipe or Not

Tex Mex Black Bean Burgers

black bean burgers

I’m not a vegetarian but I sure do love a good black bean burger.

It’s probably because they typically have really good spices in them. Plus they’re very filling and satisfying. (Hellooo fiber!)

The first time I had a black bean burger was with my best friend when I visited her in Dallas one time.

It had onion, garlic, bell pepper and plenty of Mexican spices. I really liked it and kept meaning to come up with my own recipe.

Little did I know it would take me a year to do!

black bean burgers

I tried a few times but really didn’t like how they were turning out so I put it on the back burner until recently.

My version is different than the one I had in Dallas but I was really happy with the end result.

I used a combo of black beans and brown rice and then pumped up the flavor with green chilies, lime juice, and lots of spices. They are pan-fried and hold together well as they are flipped (still be gentle though).

Tex Mex Black Bean Burgers

  • Servings: 6-7
  • Print

  • ¾ c. cooked rice (use leftover or about 1/3 c. uncooked rice, use quick cooking to make this a fast dinner)
  • 1 15 oz. can black beans, drained and rinsed
  • 1 4oz. can diced green chiles, drain a little of the liquid
  • ½ medium red onion (about ½ c.)
  • juice of 1 lime
  • 1 egg
  • ¼ c. breadcrumbs
  • 1 ½ t. chili powder
  • ½ t. garlic powder
  • ½ t. ground cumin
  • ¼ t. ground coriander
  • 1 t. salt
  • 2-3 T. canola oil

Combine all of the ingredients except for the canola oil in a medium bowl and use a potato masher to mash up the beans and combine the ingredients. (If you have a food processor, I recommend using that. I don’t have one.) Heat the canola oil in a large non-stick skillet over medium heat. Form patties that are about 4” in diameter and ½” thick. Once the oil is hot, start placing the patties in the skillet. The patties will be sticky, reshape them in the pan if needed. Don’t overcrowd the pan. Cook the first side for about 5-6 minutes, leaving the patties undisturbed while they cook. Carefully flip the patties and cook for 4-5 minutes on the second side. The burgers are done when they are brown and crispy on the outside. Line a large plate with paper towel and place the cooked burgers on it. If needed, add a little more oil to the pan and cook the rest of the patties. They will cook faster since the pan will be much warmer, 3-4 minutes per side. If the pan seems too hot, turn it down a little. Top with salsa, guacamole, or cilantro.

Author: Recipe or Not

Crock Pot Chicken Red Thai Curry

crockpotredthaicurry

When I made the move up North I knew I had to beef up my collection of slow cooker recipes. There’s just something about Crock Pot dinners that gives the same sense of coziness as curling up with a blanket and sipping on hot chocolate.

Maybe it’s just me (I suspect it’s not) but on a cold day when I know dinner is slowly simmering away and will be ready for me when I get home, the day seems a little less cold and I feel a little more like yeah-I-can-do-this-winter-thing.

crockpotredthaicurry1

Now that we’ve got the coziness equation down (slow cooker dinner = blanket + hot chocolate), let’s talk about THIS particular dinner.

Red Thai curry became a regular thing at our house after we had it at a restaurant back in Tulsa. I tried to recreate it for this bloggity blog but soon discovered that making red Thai curry meant having to use every pot and pan in my kitchen. What do I do when I don’t want to dirty a million dishes? I think “Mmm… can this be made in a Crock Pot?”

After a few tries I finally got it down. It’s not quite the same as the restaurant, but the hubs and I were really happy with the final result. And seeing how we don’t live in Tulsa anymore… that’s a good thing.

The chicken & veggies get super tender in their nice looong bath in the spicy warmth of the curry sauce. It may seem like there isn’t enough liquid but trust me, one can of coconut milk will be enough. I recommend serving it with white or brown rice to soak up those extra curry juices.

Slow Cooker Red Thai Curry; Recipe or Not

  • Servings: 4-6
  • Difficulty: easy
  • Print

  • 1 lb boneless skinless chicken breast
  • 1 eggplant, peeled & diced
  • 2 green bell peppers, diced
  • 1 small onion, diced
  • 1 head of broccoli, cut into florets

For the sauce:

  • 1 can coconut milk
  • 3 T. red curry paste (I recommend Thai Kitchen Red Curry Paste.)
  • 1 T. creamy peanut butter
  • 1 T. honey
  • juice from 1 lime (about 1 T.)
  • 1/4 t. garlic powder
  • 1/2 t. salt
  • a pinch of crushed red pepper flakes, optional for extra spice
  • brown or white rice for serving
  • fresh cilantro for topping

In small bowl, whisk together the coconut milk, curry paste, peanut butter, honey, lime, garlic powder, salt, and red pepper flakes if using. In a slow cooker, layer the chicken on the bottom, then the eggplant, followed by the green pepper, onion, and broccoli. Pour the sauce over the top. Cook on low for 7-8 hours. After the cooking time is up, use two forks to shred the chicken and give the curry a stir. Serve with white or brown rice and top with fresh cilantro.

Chicken Pot Pie with Sweet Potato & Corn

chickenpotpie

One thing I love about food is the emotional connection we have with it.

That may sound hokey but doesn’t it seem like any time you eat chicken pot pie (or chicken noodle soup) you feel just a little more at peace and that all is right with the world? Anything you’ve been worried about fades to the background… at least for a moment. But sometimes a moment is all you need to see things in a new light.

Just some veggies, chicken, broth, flour, and butter… it’s remarkable to me that a simple dish has the power to affect us that way.

chickenpotpiecollage

The sweet potato & corn lend a slight sweetness to this savory dish. There’s only one pie crust giving just enough richness to keep that comfort food status but isn’t overly rich. I’ve written chicken in the recipe but you could sub in leftover Thanksgiving turkey if you need to use it up.

chickenpotpie4

Chicken Pot Pie with Sweet Potato & Corn; Recipe or Not

  • Servings: 4
  • Print

  • 1 pie crust (If you want to make your own, I used this recipe.)
  • 1 sweet potato, diced (about 1-1.5 cups)
  • 1 small yellow onion, diced (small = about the size of a tennis ball)
  • 3 celery stalks, diced
  • 1 lb. cooked & shredded chicken
  • 1 cup frozen corn
  • 1 t. dried parsley
  • 1/4 t. ground sage
  • 1 c. chicken broth (or vegetable broth)
  • 1 c. milk (can use non-diary milk)
  • 2 T. cornstarch
  • 2-3 T. olive oil
  • salt & pepper to taste

If you’re making the pie crust yourself, do that first and store the crust in the fridge for later. Heat the olive oil in a medium-large pot over medium heat. (If you have cookware that is stovetop & oven safe, use that.) Once the oil is heated, throw in the sweet potato, onion, celery, and a pinch of salt & pepper. Let this cook for 4-5 minutes until the onions become translucent. Next, preheat the oven to 375° and add the chicken, corn, parsley, sage, and another pinch of salt & pepper. Cook for a few minutes to let the corn thaw.

In a small bowl, mix the cornstarch with a few tablespoons of the chicken broth or milk making sure there are no clumps. Add the cornstarch mixture, chicken broth, and milk to the pot; cook for a few minutes. Give the filling a quick taste and add more salt & pepper if needed. If you’re not using oven-proof cookware, carefully transfer the pot pie filling to a 9″ pie pan or baking dish. Get the pie crust out and roll it into a circle that will cover the pan. Carefully cover the baking dish with the crust and trim up the edges. Put the baking dish on a larger sheet pan in case the pot pie bubbles over in the oven. Bake for 30 minutes or until the crust is flaky and brown.

Tip: To make transferring the pie crust easier, fold it in half on a vertical into a half circle. Fold the half circle in half so the dough is folded over on itself and is a triangular shape like a large piece of pie. Put the folded over, pointed edge in the center of the pan then carefully unfold the crust to cover the whole pan.

Fall Recipe Roundup

Hey! Hope your week is going well!

While I’m still adjusting to my new home, I thought it would be fun to go through my site and find some of my best fall recipes to put together in one post. There are a lot of good recipes that get further and further in the archives. It’s time to bring them back to the spotlight!

Baked Maple Doughnuts

Mapledoughnuts1

Spiced Oatmeal Cookies — my most viewed recipe of all time!

Spicedoatmealcookies2

Roasted Poblano & Corn Chowder

Poblanocornchowder

Baked Pumpkin French Toast with Pecan Streusel Topping

IMG_2224 - Version 2

Pumpkin Ravioli with Sage & Goat Cheese

pumpkinsageravioli

Pumpkin Bars with Gingersnap Crust

IMG_2290 - Version 2


Italian Sausage, Quinoa, Veggie Skillet Dinner

italianskilletdinner

I didn’t know what to call this dish. I really wanted to be able to claim that catchy “one-pot dinner” label but this dish comes together much faster when you use two.

It’s worth it though. It’s quick and easy, the quintessential weeknight dinner. Oh and let’s not forget deeelicious! And it keeps well if there are leftovers.

italianskilletdinner1

The cast of characters include: Italian sausage, quinoa, zucchini, onion, garlic, spinach, sun-dried tomatoes, and mozzarella.

So in one pot you have the quinoa simmering away with yummy herbs like parsley & oregano. In another pan, you’re cooking up some Italian sausage and veggies. Then the quinoa joins the sausage & veggies party and the whole thing gets topped with cheeeeeese. Just a little. I mean, balance, right?

italianskilletdinner2

***I’m writing a few guest posts for the Oklahoma Women Bloggers’ website throughout September! I’d love for you to check them out. Here are the links for the 3 posted so far:

4 Things I Love About Cooking

Three Blogging Challenges and How to Overcome Them

You Know You’re a Blogger When…

Italian Sausage, Quinoa, Veggie Skillet Dinner; Recipe or Not

  •  1 lb ground Italian sausage or combo of 1/2 lb Italian sausage & 1/2 lb ground turkey
  • 1/2 of a small onion, diced (about 1/4 cup)
  • 1 zucchini, diced
  • 1-2 garlic cloves, minced
  • a couple of sun-dried tomatoes, diced (about 3 T.)
  • a handful of spinach leaves, torn into smaller pieces
  • 1/2 – 3/4 c. shredded mozzarella
  • 1/2 c. uncooked quinoa (be sure to rinse it if it doesn’t come pre-rinsed)
  • 1 1/4 c. water
  • 1/2 t. dried oregano
  • 1/2 t. dried parsley
  • pinch of salt
  • Fresh parsley, for topping

In a small or medium pot, bring the quinoa, water, oregano, parsley, and salt to a boil. Once boiling, reduce the heat and simmer the quinoa about 20 minutes or until all of the water has been absorbed. While the quinoa is cooking, heat a separate skillet to medium heat. Cook the Italian sausage or sausage/turkey combo until no longer pink in the center. Once the sausage is cooked, throw in the onions, garlic, and zucchini. Cook for a few minutes then add the sun-dried tomatoes and spinach. Once the spinach is starting to wilt, add the pot of quinoa. Stir until everything is combined and top with a thin layer of mozzarella. Cover the skillet with a lid for a minute or two to melt the cheese. Top with fresh parsley. Enjoy!

***Like this recipe? Share it with a friend and if you want free weekly recipes, click ‘Get recipes!’ on the top of the sidebar and enter your email address.


Spicy Garlic Parmesan Wings

garlicparmesanwings

Sports! Game day! Stats! Tailgating! Playoffs!

I think this is what comes to mind for most people when wings are mentioned.

I grew up watching sports because both of my brothers played multiple sports. If I don’t personally know someone playing, I don’t really keep up with a team (local, college, or professional). Shocking for an Oklahoma girl, I know.

I have absolutely nothing against sports. They just aren’t on my weekly radar minus one exception. My hubby loooves the St. Louis Cardinals. He keeps up with them and I keep up with them through him.

Thankfully, you don’t have to be a sports fanatic to enjoy some wings.

garlicparmesanwings2

I’m not going to claim these are healthy but I will claim they are probably healthier than restaurant wings. They are crispy on the outside, juicy on the inside, and covered in garlicky-Parmesan.

These are baked and we’re actually using baking powder to get them crispy. What the what?! Fo realz… the baking powder helps dry out the skin which makes them crisp up and get golden brown. #chemistry I promise you won’t even know there was baking powder on them by the time they’re done baking.

Spicy Garlic Parmesan Wings; Recipe or Not

makes roughly 20-24 wings

For the wings:

  • 2 lbs. chicken wings (the small hot wing size)
  • 1 T. baking powder (trust me, you will NOT taste this)
  • a good pinch of salt & pepper

For the sauce:

  • 2 T. olive oil
  • 1 T. melted butter
  • 1 tsp. garlic powder
  • pinch of dried parsley
  • 1/4 c. grated Parmesan
  • big pinch of crushed red pepper flakes (use more or less depending on how spicy you like wings)

Preheat oven to 400°. Rinse the wings and dry them really well. Toss them with the baking powder, salt, and pepper then spread them out on a foil-lined baking sheet, skin side up. Bake them for 50 minutes or until they are golden brown and the tops are crispy. In the last few minutes of baking, prepare the sauce – stir together the butter, olive oil, garlic powder, and parsley. In a large bowl, toss the wings in the sauce, grated parmesan, and crushed red pepper flakes. Serve immediately.

***Like this recipe? Share it with a friend and if you want free weekly recipes, click ‘Get recipes!’ on the top of the sidebar and enter your email address.

Homemade Chorizo Tacos with Mango & Red Onion

homemadechorizotacos

Writing a food blog has made eating at restaurants more entertaining.

When I really like something it becomes this fun guessing game – “What kind of cheese is in this mac and cheese? Is it white cheddar? You know what… I think it’s a combination. Yeah, it has to be a combination.” It usually results in me asking the server –  “Excuse me, what kind of cheese is this?”

Getting inspiration for recipes from restaurants is easy. Recreating the recipes is another story. Especially when they use things like “house seasoning” or “house dressing”. I haven’t fine-tuned my tastebuds to that level of discernment yet.

homemadechorizotacos2

Luckily this recipe was restaurant-inspired, but not impossible to recreate. The restaurant it came from made their chorizo in house and thankfully, chorizo seasoning is not some kind of locked up family recipe requiring maximum level clearance to get access to. I did have to do quite a bit of Googling though. :) It took a couple tries but I’ve got it down now.

You can never go wrong with a salty sweet combo. I love all the spices of the chorizo combined with ripe, juicy mango. The red onion adds a nice bite while the cilantro brings a pop of freshness. This is a super easy recipe and would be a flavorful and quick weeknight dinner.

Homemade Chorizo Tacos with Mango & Red Onion; Recipe or Not

makes 10-12 crispy tacos

For the chorizo:

  • 1 lb. ground pork
  • 3 garlic cloves, minced
  • 2 T. apple cider vinegar
  • 1 1/2 T. smoked paprika
  • 1 1/2 t. salt 
  • 1 t. chili powder
  • 1/2 t. ground cumin
  • 1/2 t. ground coriander
  • 1/2 t. dried oregano
  • 1/4 t. ground cinnamon
  • 1/4 t. cayenne pepper, optional
  • big pinch of black pepper

For the tacos:

  • 1 mango, diced
  • 1/2 red onion, finely diced
  • 10-12 crispy taco shells
  • cilantro for topping

Heat a skillet on medium heat. In a bowl, combine the ground pork and all of the seasonings until the seasonings are evenly mixed. Cook the chorizo, breaking it into small pieces with a spatula or spoon every couple of minutes. Cook until the chorizo until no longer pink inside (as best you can tell since it is tinted red from the paprika), about 12-15 minutes or so. Fill the taco shells with a spoonful or two of chorizo, top with mango, red onion, and cilantro.

***Like this recipe? Share it with a friend and if you want free weekly recipes, click ‘Get recipes!’ on the top of the sidebar and enter your email address.